00:00: Learn how to efficiently add and configure new users in Pace Gateway.
00:04: This guide covers user creation and setting IP access controls to enhanced
00:09: security and management.
00:10: Navigate to the main dashboard to begin managing your account settings.
00:15: Access the control panel to find Advanced configuration options.
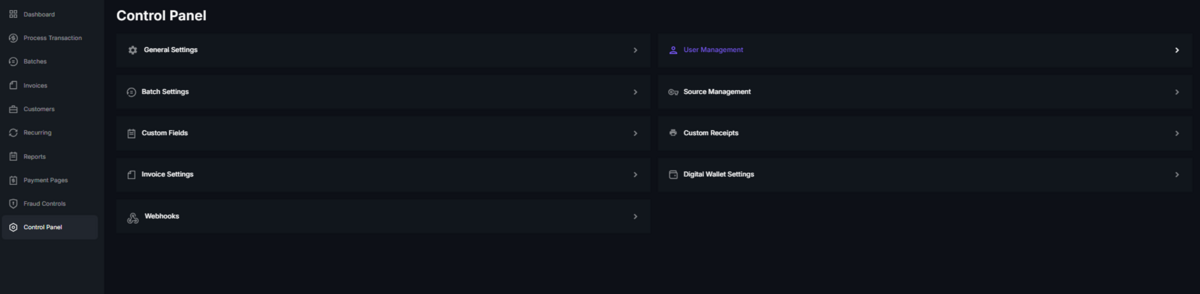
00:19: Open the user management section to oversee user accounts and permissions.
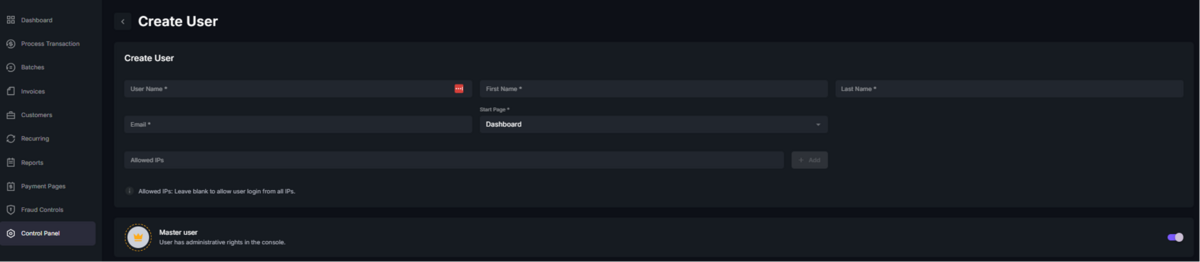
00:25: Initiate the process to add a new user by selecting the new user option.
00:30: Enter a unique username to identify the new user within the system.
00:34: Provide the user's first name to personalize their account.
00:38: Input the user's last name to complete their personal details.
00:41: Add the user's email address for communication and login purposes.
00:46: Return to the dashboard to continue. Configuring user-specific settings.
00:51: Go to the allowed IPS section to specify network access restrictions.
00:55: Enable IP restrictions by selecting the appropriate toggle or option.
01:00: Enter the specific IP addresses that the new user is permitted to access from.
01:04: Confirm the IP address, entries to enforce the access rules.
01:08: Save all changes to finalize the new user setup and security settings.
01:13: This guide walked you through adding a new user entering their personal details, and
01:17: configuring IP based access restrictions to secure their account within the pace.
01:21: Katwe platform.
User Access Overview
In the Control Panel tab on the left panel, the User Management tab allows you to manage and control user access, permissions, and default visibility for specific fields.
Adding new users:
To add users to an account, click on the +Create new button on the top right corner of the page.
Create a unique username (usernames are case sensitive)
Enter first and last name
Input an email address
Select a start page (the page the user will see when they log in)
An IP address can be entered to limit the user to logging in from specific IP address(es) only, such as the office computer
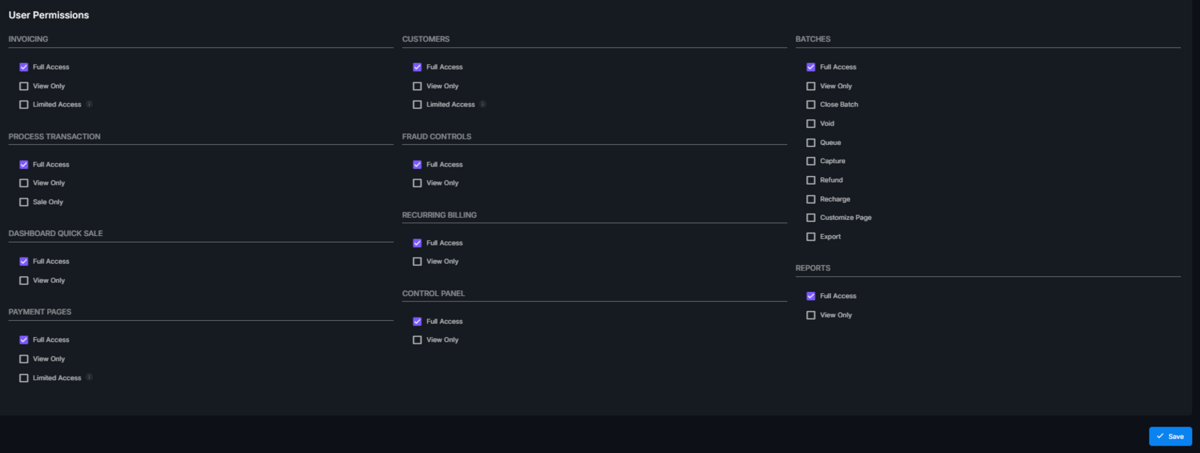
Set user access
Master User grants full permissions and access
User permissions can be individually selected for non-master users
Click Save
The user will receive an automated email with a link to the virtual terminal along with a username and temporary password.
TIP! If a new user claims not to have received an email, please have them check additional folders such as spam, junk, promotions etc.
Limited permission users:
There are different levels of permission and access you can grant a specific user, and they can be limited to certain features.
e.g., you can grant a user full permission for processing a transaction, but still block access from the invoicing tool.
Full access gives the user full permissions on these tabs/features.
View only allows them to see the page and displayed information but blocks them from making any changes or taking any actions.
Limited Access means that only the user which created this customer or invoice will have the ability to make changes to the customer profile or invoice.
Sale Only allows the user to process a sale, but not an authorization, post-authorization or refund/credit.
Managing users:
On the User Management screen, you can edit user profiles, activate/deactivate users, and delete users.
You can also restore or reset a user’s password, if your permissions allow.