Back to Tech Guides

PaySec Advanced Gateway - Recurring and Scheduled Payments

Overview:

Recurring Payments allow you to set up a schedule for transactions to run automatically according to a specified frequency. You can edit or modify the schedule at any time.

00:00: This tutorial guides you through setting up recurring and scheduled payments using

00:04: PaySec Advanced Gateway.

00:06: Before you begin ensure, you have access to your customer accounts and the necessary payment

00:10: details. By following these steps you'll automate Payment Processing

00:14: to save time and reduce manual effort.

00:17: Click dashboard to start from the main overview of your account.

00:21: Click process transaction to begin. Setting up a new payment.

00:25: Click customer to select the customer for this transaction.

00:29: Click to choose the specific customer account.

00:32: Click amount asterisk to specify the payment.

00:35: Phil 5 to set, the transaction amount to 5 units.

00:38: Click surcharge to add an additional fee to the transaction.

00:42: Click surcharge again to confirm surcharge details.

00:46: Fill one to set the surcharge amount to

00:48: Click here to proceed to the next step in the transaction.

00:52: Click create recurring schedule to start. Configuring the payment recurrence.

00:56: Feel true to enable the recurring payment option.

00:59: Phil new to name this, recurring payment schedule.

01:02: Click forward slash forward, slash to set the date or delimiter for the schedule.

01:07: Click here to select the day of the month for the payment.

01:10: Click 15 to choose the 15th as

01:13: Click here to open the frequency options.

01:16: Click monthly to set the payment to recur, every month.

01:20: Click time star to specify how many times the payment should.

01:24: Phil 10 to set the payment to repeat 10 times.

01:27: Click repeat this transaction times an ongoing to enable ongoing repetition.

01:32: Click process transaction to finalize, the payment setup.

01:36: Click done to complete and save the transaction.

01:39: Click recurring to view. All scheduled recurring.

01:42: Click Test Company to select the customer for updating schedules.

01:47: Click update to modify the existing recurring payment.

01:50: Click here to access additional schedule options.

01:54: Click here to adjust the recurrent settings.

01:57: Click monthly to confirm monthly.

02:00: Click weekly to change the recurrent.

02:02: Click update to save the changes to the

02:05: Click here to exit the schedule settings and return to the dashboard.

02:09: You have successfully set up and managed recurring and scheduled payments for your customer

02:13: account. Verify your scheduled payments under the recurring section to ensure

02:18: accuracy for further management.

02:20: Explorer updating or canceling schedules as needed.

Recurring and Scheduled Payments Overview

Creating a Recurring/Scheduled Payment:

  • To create a recurring or scheduled payment, navigate to the Process Transaction tab in the left panel.
  • Enter the customer and card or check details as instructed in 1A) Processing a transaction.
  • Scroll to the bottom of the page and click the banner labeled Recurring Payment.
  • Check the Create recurring schedule checkbox.
  • Enter a title for this schedule in Payment Title field.
  • Choose when the schedule should begin using the First Run (EST) calendar.
  • Select a frequency for the schedule (daily, weekly, biweekly, monthly, bi monthly, quarterly, biannually, annually.)
  • Enter the number of times this transaction should run or select ongoing to auto-bill until the plan is manually turned off.
  • Click Process Transaction.

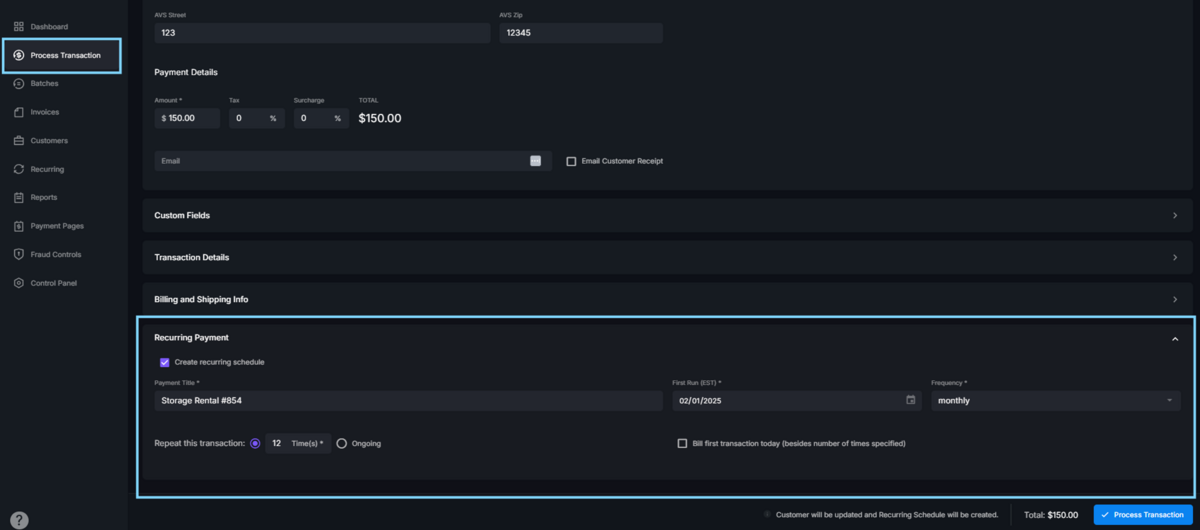
TIP! If you choose a future date for the First Run, the transaction will NOT process when you click Process Transaction. It will be processed on the specified First Run date.

If you choose a future date for the First Run, the Bill First Transaction Today checkbox (beside the number of times specified) will give you the option to process a transaction today in addition to the scheduled transactions.

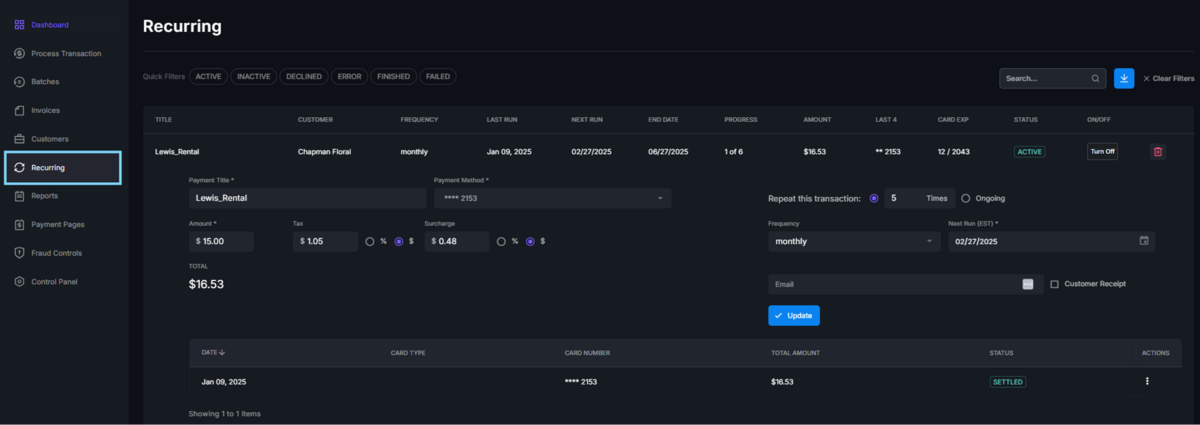
Modifying a Recurring/Scheduled Payment:

  • To modify a recurring schedule, navigate to the Recurring tab on the left panel.
  • Locate and click the schedule you wish to edit.
  • Edit schedule as desired.
  • Click Update.

TIP! Manage the number of reattempts for failed transactions and set the processing time for recurring billing transactions by navigating to Control Panel> General Settings> Recurring billing