The Hosted Payment Pages feature allows you to create and customize secure payment forms that customers can access to make a payment.
The builder will be hosted on a generated URL/link that the merchant can place anywhere they expect their customers to visit.
00:00: Learn how to create and customize payment pages in Pacific Way with this step by step
00:04: guide.
00:05: You'll configure page details, select themes and templates and enable payment
00:09: methods to build a functional payment interface.
00:12: Navigate to the main dashboard to begin, managing your payment settings.
00:17: Access the payment Pages section to view and create payment interfaces.
00:21: Initiate the creation of a new payment page by selecting the new payment page
00:26: option.
00:27: Focus on the display name. Field to assign a clear descriptive title for your payment
00:31: page.
00:33: Enter a meaningful name. That will identify your new payment page to users and
00:37: administrators.
00:38: Select the URL field to define a unique web address for your payment page.
00:43: Input a concise and relevant URL slug, that users will use to access
00:47: the payment page.
00:48: Open the action drop-down menu to specify.
00:50: The payment action to be performed.
00:53: Choose the charge action to enable payment processing on this.
00:57: Reopen the action menu to confirm or adjust your selected payment action.
01:02: Select the light theme to apply a bright and clean visual style to your payment page.
01:07: Confirm the light theme selection to ensure consistent appear,
01:11: Choose the standard horizontal template to structure your payment page layout.
01:15: Name this template clearly to differentiate it from others.
01:18: In your
01:19: Select the blank template to create a minimalist payment page layout.
01:23: A sign, a simple name to the blank template for easy identification.
01:27: Pick the standard vertical, template to arrange elements in a vertical format.
01:32: Label, this vertical template appropriately for future reference.
01:35: Save your new payment page and its configurations to preserve your work.
01:40: Start creating another new payment page to explore additional customization options.
01:45: Click through the interface to access advanced customization features.
01:49: Continue exploring customization options by interacting with available links.
01:55: Navigate through the customization interface to reveal More Design settings.
01:59: Use the provided links to delve deeper into style and layout adjustments.
02:04: Access further, customization areas by following the on-screen prompts.
02:09: Explore the fonts section to modify typography settings for your payment page.
02:14: Revisit the fonts area to ensure all text Styles meet your preferences.
02:19: Open the decorations menu to add visual enhancements to your payment page.
02:23: Return to the decorations section to fine-tune decorative elements.
02:28: Access the dimension settings to adjust the size and spacing of page components.
02:33: Reopen the dimensions menu to confirm your layout measurements.
02:37: Select the invoice number field to customize invoice, related information.
02:41: Use the interface to modify invoice. Display options as needed.
02:45: Interact with additional links to explore more customization possibilities.
02:50: Continue navigating through the customization menus to access various page
02:55: elements.
02:56: Open the sections area to manage different content.
02:58: Blocks on your payment page.
03:01: Access the column settings, to organize content into structured layouts.
03:05: Explore basic fields to add standard input, elements to your payment page.
03:10: Use the interface to insert necessary form fields for payment processing.
03:15: Navigate to the extra section to include supplementary features or content.
03:20: Select the image option to add visual branding or illustrations.
03:24: Use the interface to upload or select images for your payment page.
03:28: Fill in required fields to complete image or content additions.
03:32: Interact with the interface to finalize your content updates.
03:36: Close any open dialogues or pop-ups to return to the main editor?
03:40: Continue exploring customization options through available links.
03:44: Use the interface to make further adjustments to your payment page.
03:48: Navigate through additional customization menus as needed.
03:52: Access the save and exit option to finalize and leave the editor.
03:57: Use the interface to confirm your save changes and exit.
04:01: Continue interacting with the platform to review your payment page.
04:05: Open the payment page, URL to preview it, in a new tab or window.
04:09: Switch to the payment page domain to test live functionality.
04:13: Click the check button to verify the payment page status and settings.
04:18: Select Google pay as a payment method to enable it for users.
04:22: Choose credit card as an additional payment option for broader acceptance.
04:26: Interact with the payment interface to simulate a transaction and confirm setup.
04:31: This guide covered creating and customizing payment pages in peska 2,
04:35: including naming URL setup, theme, selection template configuration
04:39: and adding payment methods like Google pay and credit card.
04:42: It also detailed Advanced customization options and testing your payment page
04:47: for readiness.
Payment Pages Overview
00:00: This tutorial guides you through creating and sending a text to pay payment page using
00:04: pastec Advanced Gateway.
00:06: Before you start, ensure you have access to your PaySec Advanced Gateway dashboard and
00:10: the necessary payment details such as invoice
00:12: number, customer contact information, and payment amount.
00:15: Click dashboard to access the main control panel, where you manage your payment settings.
00:21: Click payment pages to view and manage your existing payment.
00:25: Click new payment page to start creating a new payment page.
00:29: Quick display name of page star to specify the name that will appear for this payment
00:33: page.
00:34: Fill text to pay link as the display name to identify this payment page easily.
00:39: Click URL test to enter the web address for the payment page.
00:43: Fill text to pay link as the URL to link this payment page correctly.
00:47: Click select an action action action charge to choose the action that will be triggered by
00:51: this payment page.
00:53: Click save to store the new payment page settings.
00:57: Click here to proceed to the next configuration step.
01:00: Click here to continue setting up your payment page options.
01:04: Click save and exit to save your changes and exit.
01:06: The
01:07: Click here to access the payment page preview or additional opt.
01:12: Click here to open the payment page details for review or editing.
01:16: Click invoice hashtag to select or enter the invoice.
01:18: Number associated with the payment.
01:21: Click customer to specify the customer related to this payment transaction.
01:26: Click email to enter the customer's email address for sending payment information.
01:30: Click phone to add the customer's phone number for contact purposes.
01:34: Click amount to specify the payment amount for this transaction.
01:38: Click description to provide details about the payment or invoice.
01:42: Click here to review the payment page summary or settings.
01:46: Click here to confirm the payment details before sending.
01:50: Click here to finalize the payment page setup.
01:53: Click send link to send the payment link.
01:56: Click send link again to confirm and complete the sending process.
02:00: You have successfully created and configured a new text to pay payment page specified,
02:04: the necessary payment details, and sent the payment link to the customer.
02:09: To verify success. Confirm, the customer, receive the link and can access the payment
02:13: page. For further assistance, explore related tasks such as managing
02:17: payment, page, templates, or tracking payment statuses
Text2Pay Overview
Building a page:
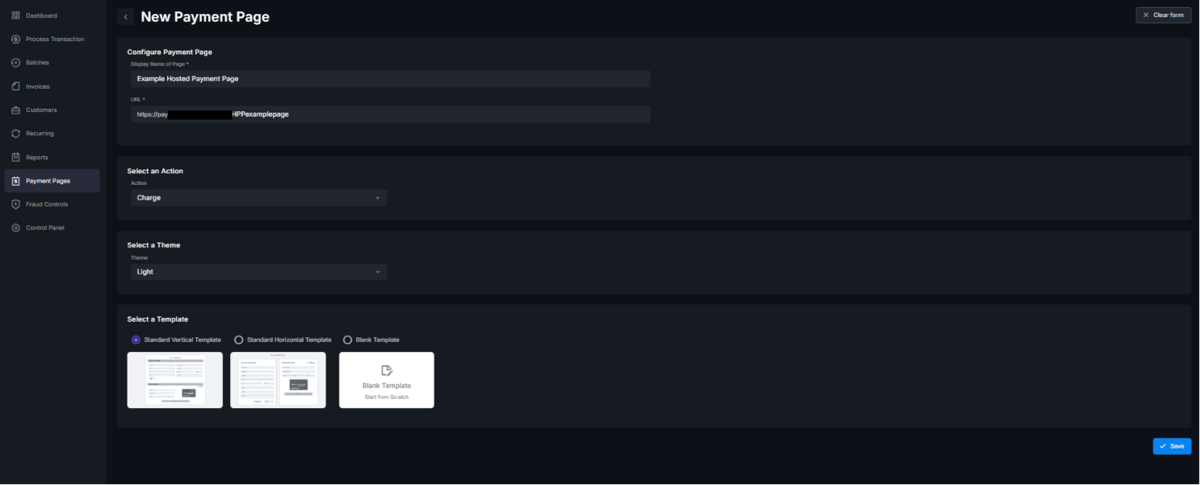
To create a payment page, navigate to the Payment Pages tab and click New Payment Page in the top right corner.
Enter a unique name within the Display Name of Page field which will be used to identify the payment page within the gateway (e.g., Chai's Treat Shop).
Use the URL field to create a slug (the last section of the URL).
-The URL will be visible to customers when visiting the Hosted Payment Page.
-The Slug should be at least 5 characters long.
Choose an action:
Charge – default, will authorize and capture funds.
Auth Only places a hold on funds. Transaction would need to be captured manually
Save Customer/Payment Method Creates a customer record. Customer will not be charged.
Select a light or dark mode theme.
Choose a template or create the payment page from a blank template.
Click Save.
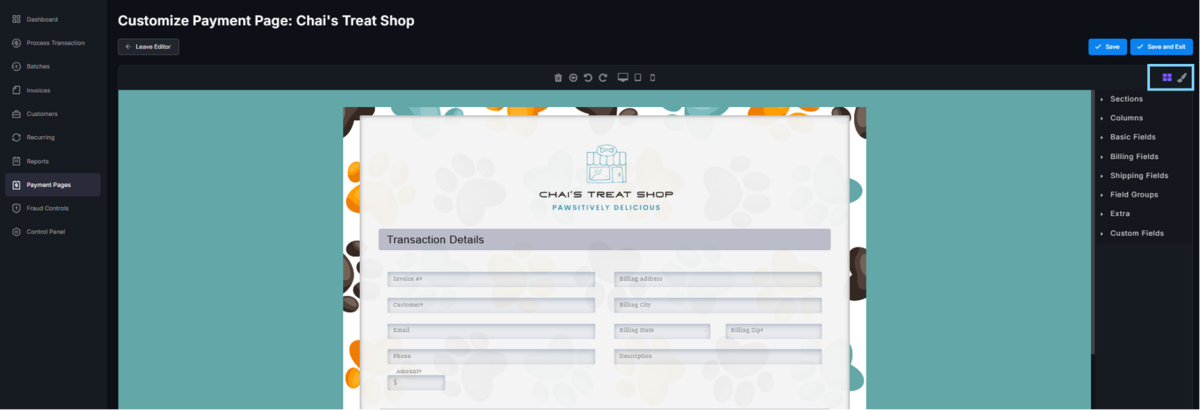
Customizing/Editing a page:
You will be directed to the page builder. This is where you can customize the page as desired.
There are two sections that control the page: Blocks and Design.
The Blocks section allows you to add sections, columns, fields, text, images, and more to the page. Simply drag and drop the input onto the page.
Under Blocks you will find additional fields such as recurring, surcharge, terms and conditions, custom fields and more which can enhance the capabilities of your payment page.
The Design section controls the appearance of the page, allowing you to customize fonts, size, colors, images, borders, and more.
Highlight the part of the page you wish to alter by clicking on the field, text, or section, and use the Design section to make the changes.
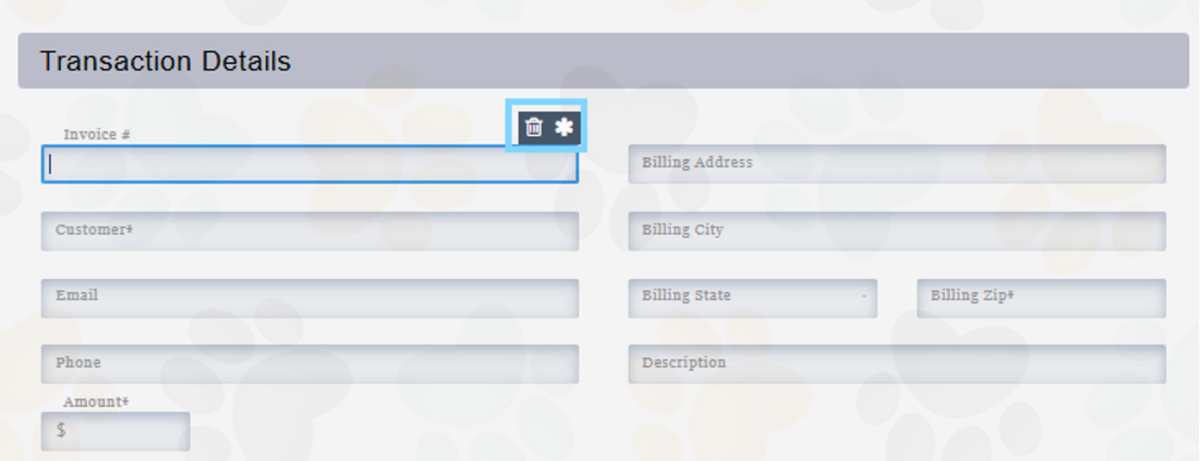
Most fields can be deleted or set to require by using the trash can or asterisk icons visible when a field is selected.
TIP! Be sure to save your page throughout the editing process so you do not lose your progress.
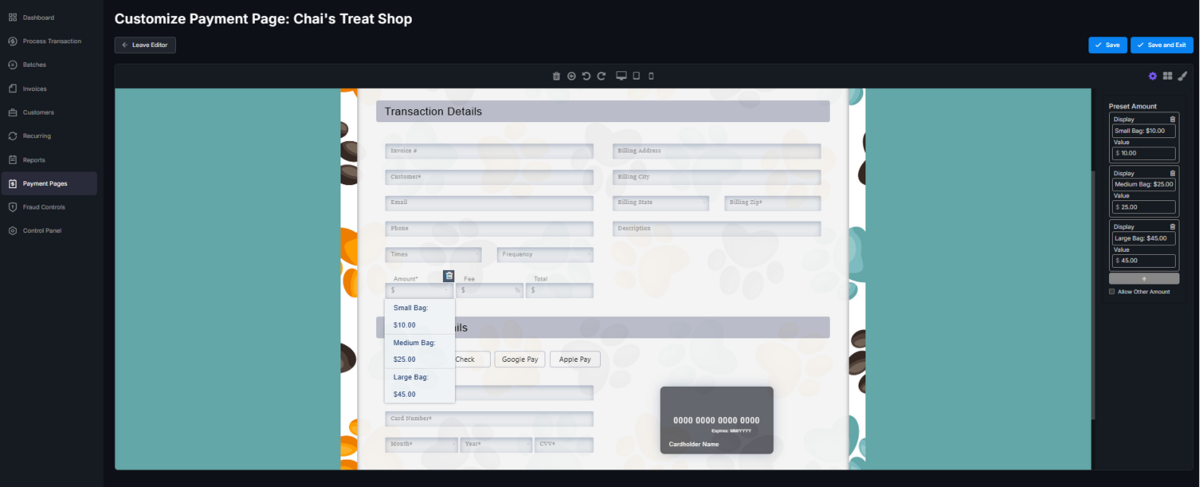
Certain fields, such as amount, surcharge, Recurring, and description, when selected, will allow additional customization in the right sidebar, enabling you to configure these fields with preset values.
The Display field, visible to the customer, can contain alphanumeric characters.
The Value field represents either the total calculated by the page or the text displayed in reports.
• Once you’re ready to save the page, click Save and Exit in the top right corner.
• The page URL will now be listed under the Payment Pages tab.
The URL can be copied and provided to customers.
• You can always activate/deactivate, edit, or delete a page by using the icons to the right of each page.
TIP! Visit section 8) Fraud Controls to protect your hosted payment page against potential unwanted activity.