The Control Panel provides a centralized hub for managing your account settings and customizing various features. From here, you can configure essential settings such as email contacts, source management, generate API Keys for integrations, configure webhooks, customize receipts, and fine-tune other essential tools to fit your business needs. This customizable flexibility allows you to tailor your payment system to match your specific requirements.
00:00: Explore the control panel features to customize your payment Gateway settings.
00:03: Comprehensively
00:05: This guide walks you through managing emails, API Keys batch reports, invoices
00:09: webhooks users payment sources, receipts, and digital wallets with ease.
00:14: Navigate to the main dashboard to begin managing your account settings.
00:19: Access the control panel to configure system-wide, preferences and options.
00:23: Open general settings to customize core application behaviors.
00:28: Locate the section for sending transaction emails to manage notification, recipients.
00:33: Review and select the list of added email, addresses for transaction notifications.
00:38: Activate or deactivate email notifications by toggling the status setting.
00:43: Set the email notification status to active by entering the appropriate value.
00:47: Access the API key section to manage your integration credentials securely.
00:52: View the secret key details to handle authentication tokens safely.
00:56: Follow the prompt to generate or reveal API credentials as needed.
01:01: Open batch settings to configure how transaction batches are processed and
01:05: reported.
01:06: Select the batch processing interval such as every 24 hours to schedule reports,
01:12: Adjust the batch retention period, for example, to five days to Control
01:16: Data availability.
01:18: Return to batch settings to review or modify batch related configurations.
01:23: Customize, the batch report columns by selecting, which transaction?
01:28: Use the interface to add or remove specific data fields from batch reports.
01:32: Navigate to invoice settings to personalize, your billing documents.
01:36: Upload your company logo by dragging the file or selecting it to Brand
01:40: invoices.
01:42: Access invoice details to specify the information displayed on each invoice.
01:46: Use the provided options to further, customize invoice, content, and layout.
01:51: Open, the webhooks section to manage real-time event notifications.
01:55: Add a new webhook to integrate external systems with your payment Gateway.
02:00: Enter the webhook URL where eventdata will be sent securely.
02:04: Provide a clear description for the webhook to identify its purpose.
02:09: Use the interface to save and activate the webhook configuration.
02:13: Navigate to user management to oversee account users and permissions.
02:17: Initiate the process to add a new user to your system.
02:21: Complete the form and submit to create the new user account.
02:25: Use the interface to review or edit, existing user details.
02:29: Access additional user management options as needed.
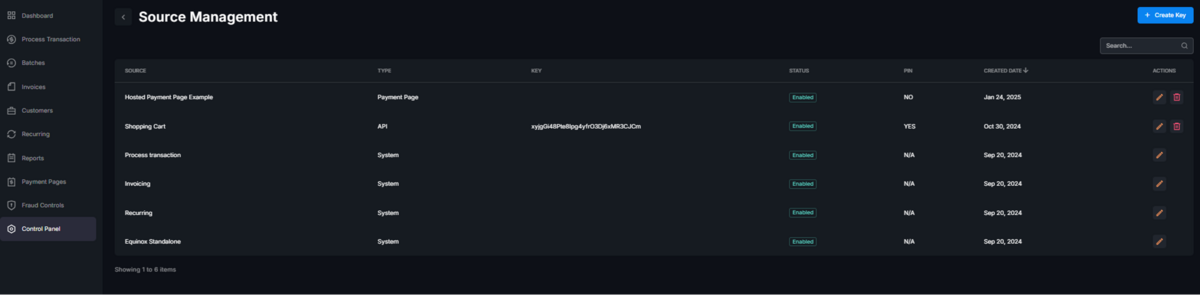
02:33: Open source management to handle payment Source configurations.
02:37: Create a new payment key to enable transaction processing.
02:41: Name the new payment key to identify its function or usage.
02:45: Select payment methods. Such as credit card to enable processing options.
02:50: Enable eCheck as a payment method if applicable.
02:53: Activate cash. Payment options for in-person transactions.
02:57: Configure cache charge refund settings to manage cash transaction
03:01: adjustments.
03:03: Use the interface to save and confirm payment Source settings.
03:07: Access custom receipts to tailor the appearance and content of receipts.
03:11: Use the tools provided to design and Implement custom, receipt templates.
03:16: Navigate to digital wallet settings, to manage wallet payment options.
03:21: Adjust wallet configurations to support digital payment methods, effectively.
03:26: This guide covered navigating the control panel to configure email notifications API
03:34: user management, payment Source settings, customer receipts and digital wallet options.
03:39: It empowers you to tailor your payment Gateway for efficient operation.
Control Panel Overview
Receipt Settings:
Receipt Settings control the email addresses receipts are sent to each time a transaction is processed.
The configuration can be found under Control Panel> General Settings.
Emails listed under Send Transaction Emails To will receive a notification for every successfully processed transaction.
Emails listed under Send Transaction Error EmailsTo will receive notifications for transactions that encounter errors, such as declines, blocks or rejections.
Errors may occur due to conflicting fraud controls or declines from the card issuer. Be sure to review the Transaction Result under Reports for more details.
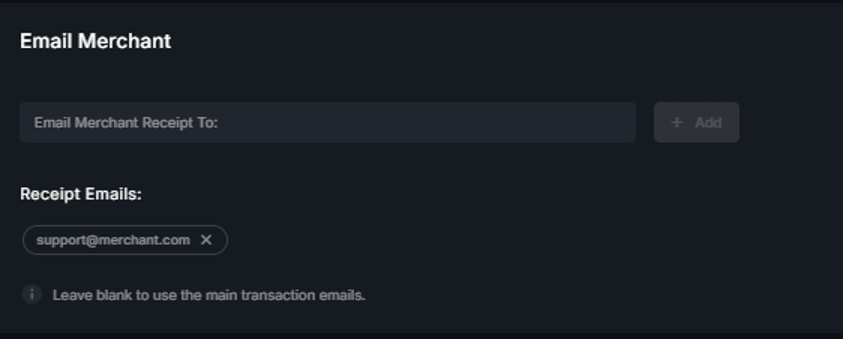
If you do not wish to receive any receipts a fictious email can be entered.
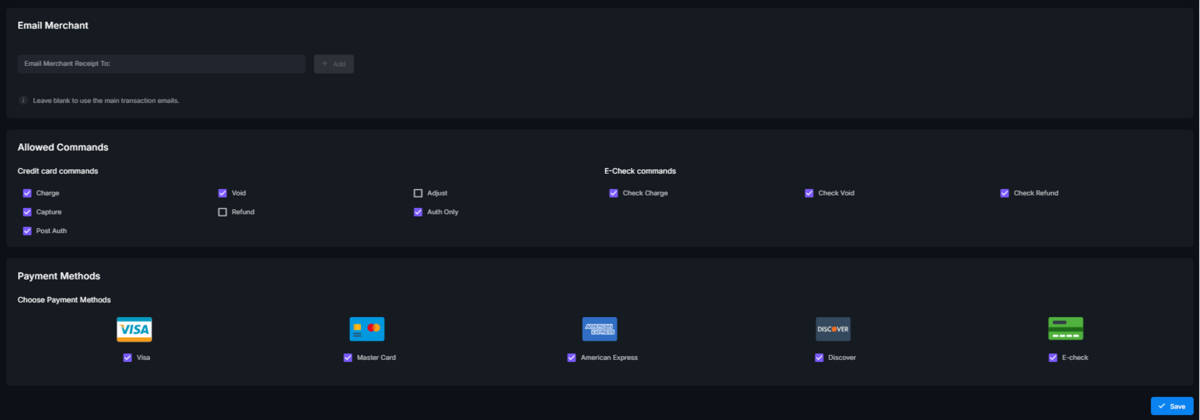
If you would like to receive emails for only a specific source (e.g., Hosted Payment Page), you can enter a fictitious email address under Receipt Settings.
Then, navigate to Source Management, click the Pencil icon to edit the desired source, and add the email address for receipt notifications under the Email Merchant section. Click Save to apply changes.
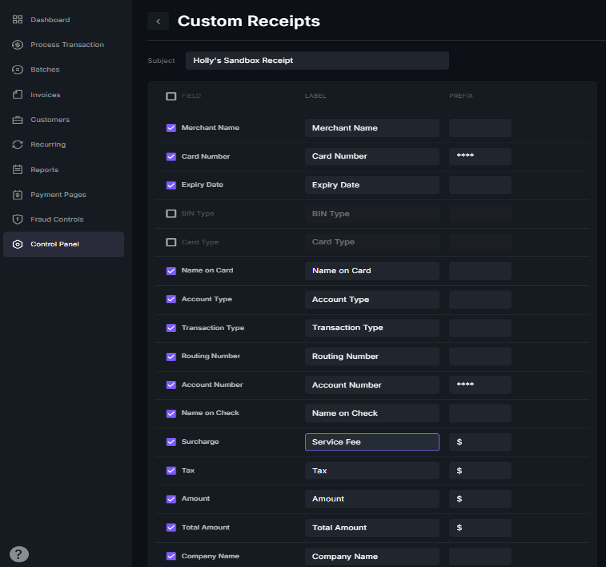
Custom Receipts:
Control Panel> Custom Receipts allows you to manage which fields appear on receipts.
Simply check the box for any field you want to display.
Use the Label option to rename fields to align with your business terminology (e.g., Surcharge can be renamed Service Fee).
Be sure to save your changes.
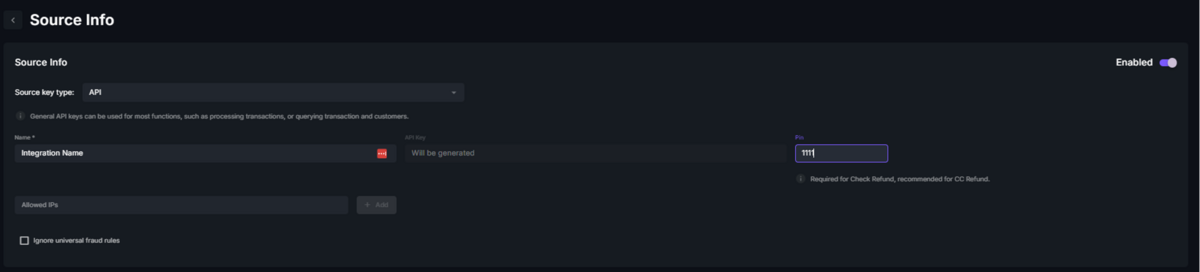
Generate API Keys:
API keys allow integrations to communicate with the gateway.
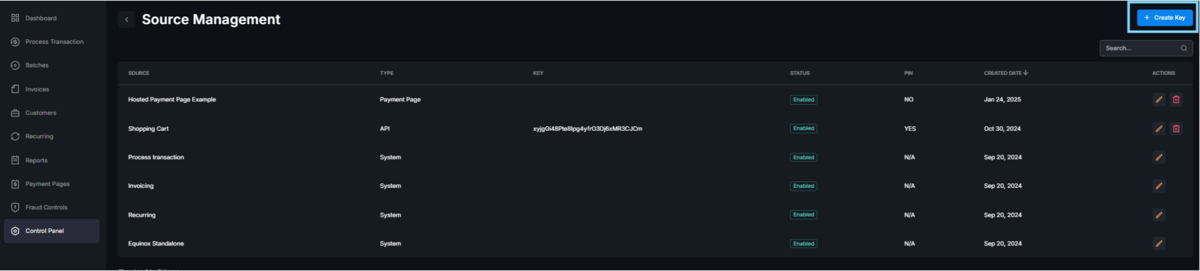
To generate an API Key navigate to Control Panel> Source Management
and select + Create Key.
Create a Name for the source. This is utilized to identify the record within the gateway. Ex: WooCommerce Shopping Cart
A Pin is optional and can be set to a value of your choosing.
Select Allowed Commands. These are the functions you would like to allow through this connection.
Confirm Payment Methods, align with what you would like the integration to process.
Select Save
The API Key will generate beside the name you inputted on the source management tab.
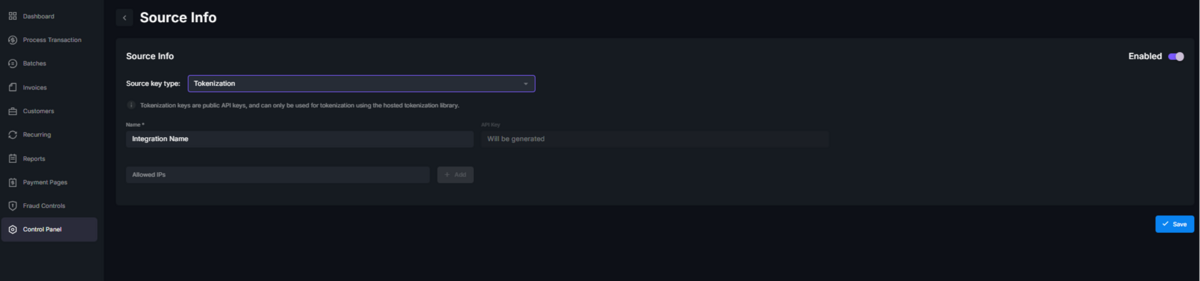
Generate Tokenization Key:
Select Control Panel> Source Management> + Create Key
Set source key type to Tokenization
Create a Name for the source. This is utilized to identify the record within the gateway. Ex: WooCommerce Shopping Cart
The Tokenization Key will generate beside the name you inputted on the source management tab.
Digital Wallet Settings
Digital Wallets are automatically supported when utilizing Invoices and Hosted Payment Pages. Effectively allowing customers to utilize their preferred payment method.
Digital Wallet Settings found within Control Panel can be utilized to configure Google Pay and Apple Pay for API integrations or to disable Digital Wallets within the gateway.