The Batches tab allows you to view the current batch as well as earlier batches for credit cards, checks, and terminals. From here, you can manually close a batch, export batch reports, and view queued (authorized) transactions. It is also where the Batch Upload feature is located.
00:00: In this tutorial, you will learn how to configure and manage batches within PaySec
00:04: Advanced Gateway.
00:05: Before starting ensure you have access to the control panel and necessary permissions
00:10: to modify batch settings.
00:12: Click dashboard to start managing your batches from the main overview.
00:16: Click control panel to access the settings and configuration options.
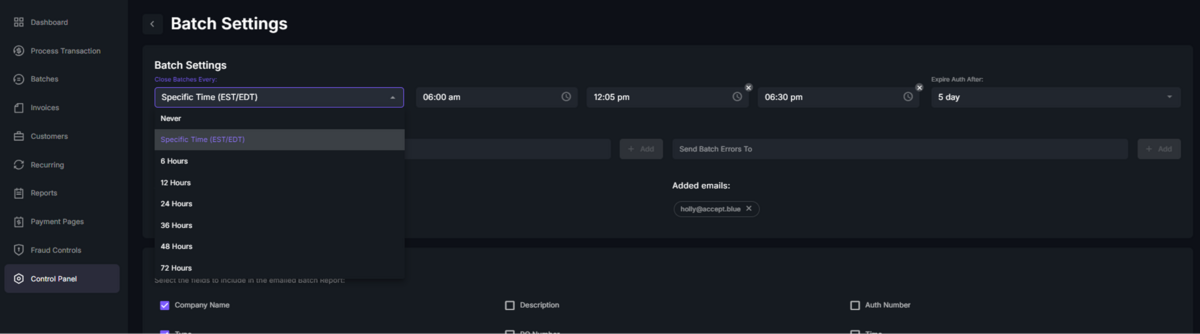
00:21: Click batch settings to open the batch processing preferences.
00:24: Click 24 hours to set the batch closing interval to daily.
00:29: Click closed batches every 24 hours to confirm the batch Auto close frequency
00:33: and expire off after five day to set authorization expiration,
00:38: Click Five day to specify the authorization expiration period after batch closing.
00:43: Click batch settings again to review or adjust batch preferences as needed.
00:47: Click, Send batch reports to designate recipients for batch summary emails.
00:52: Click Send batch errors to specify who receives error notifications for batches.
00:57: Click added emails, Nick at Pac to confirm the email addresses
01:01: set for batch Communications.
01:04: Click batches to return to the batch overview screen.
01:07: Click batch will Auto closed, September, 16th 2025, 148
01:11: pm, to view details of the scheduled batch closing.
01:15: Click batch will Auto closed September, 16th 2025, 148
01:19: PM. Again to ensure the batch timing is correct.
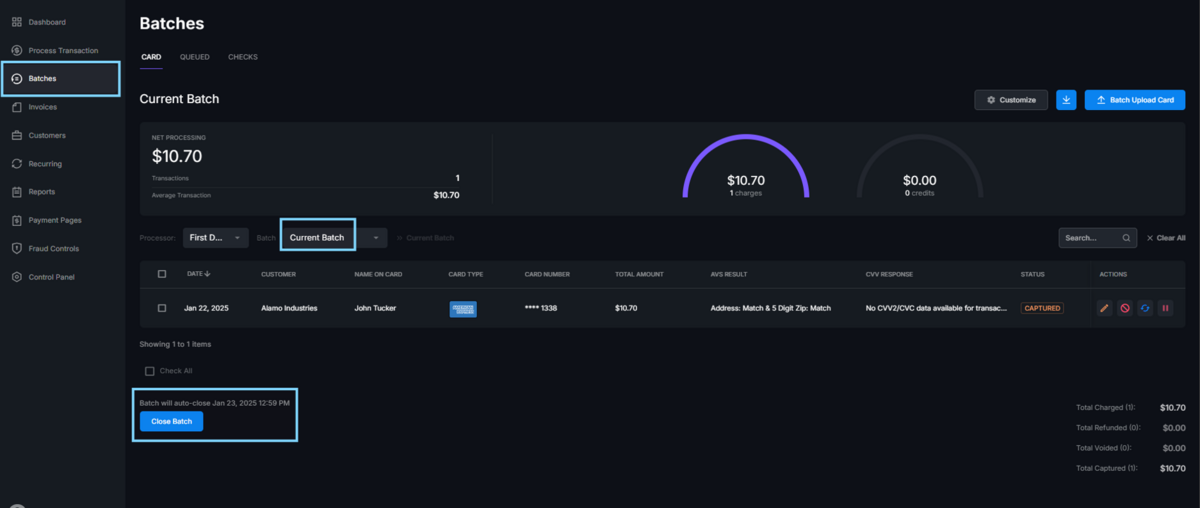
01:23: Click close batch to manually close the selected batch before the scheduled time.
01:28: Click yes to confirm the manual batch closure action.
01:32: Click here to proceed with additional batch management options.
01:40: Click cancel to exit the batch, upload process without making changes.
01:44: Click queue to view batches that are waiting to be processed.
01:48: Click customize to adjust, batch display or processing.
01:52: Click cancel to discard any customization changes and return to the previous screen.
01:57: Click checks to manage check payment batches separately.
02:01: Click batch upload ACH to start uploading ACH payment batches.
02:05: Click cancel to exit the ACH batch upload without saving changes.
02:09: You have successfully configured batch, settings, manage batch, schedules and handled
02:13: batch uploads, for card and ACH payments.
02:16: To verify success confirm that batches Auto close is scheduled and reports are sent
02:20: to designated emails for further batch management.
02:23: Explore related tasks like transaction reconciliation or error handling.
Batches Overview
Batch Closures:
Batch close time can be set by navigating to Control Panel> Batch Settings and utilizing the “Close Batches Every:” dropdown to make a selection.
You can set up to three automatic batch closures daily by selecting specific times (EST/EDT) and clicking + Add button.
Open batches can also be manually closed at any time by clicking the Close Batch button in the bottom left corner of the Batches screen.
Batch Uploads:
Batch Uploads allows you to use a template to generate a CSV file, which can be uploaded to automatically process many transactions at once, rather than processing each transaction manually.
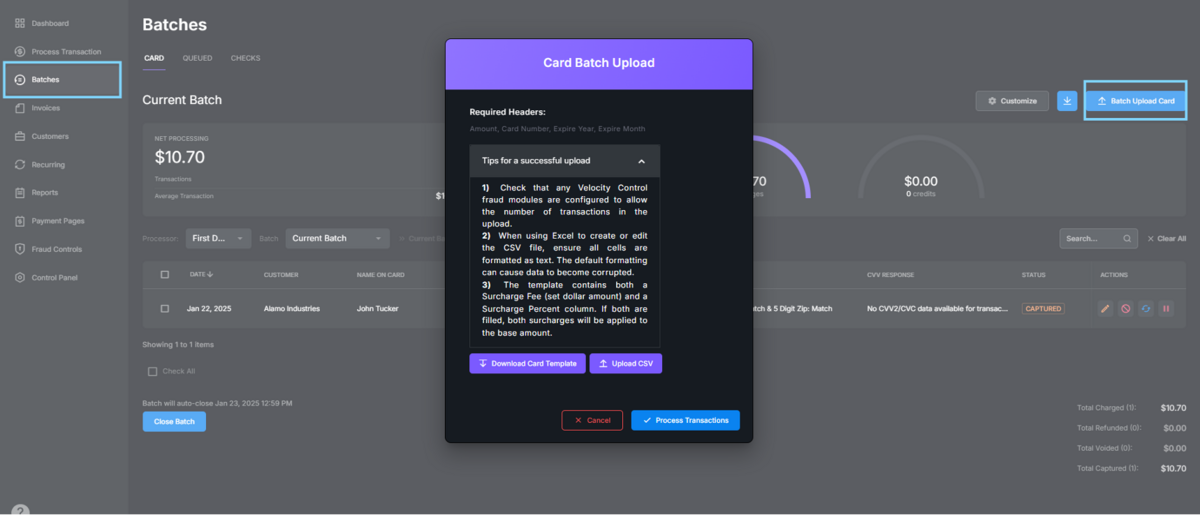
To upload a card batch, navigate to the Batches
tab on the left panel and click the Batch Upload card button in the top right corner of the page.
A pop-up will appear, giving you the option to download the card template with the required headers: Amount, Card Number, Expire Year, Expire Month, and additional optional data columns.
Once you have configured the CSV file with your card transactions, upload it to the gateway by clicking the Upload CSV
button in the Batch Upload Card pop-up.
Click Process Transactions, and the gateway will automatically process all transactions.
You can view details and status of transactions in the Reports tab, just as you would for regularly processed transactions.
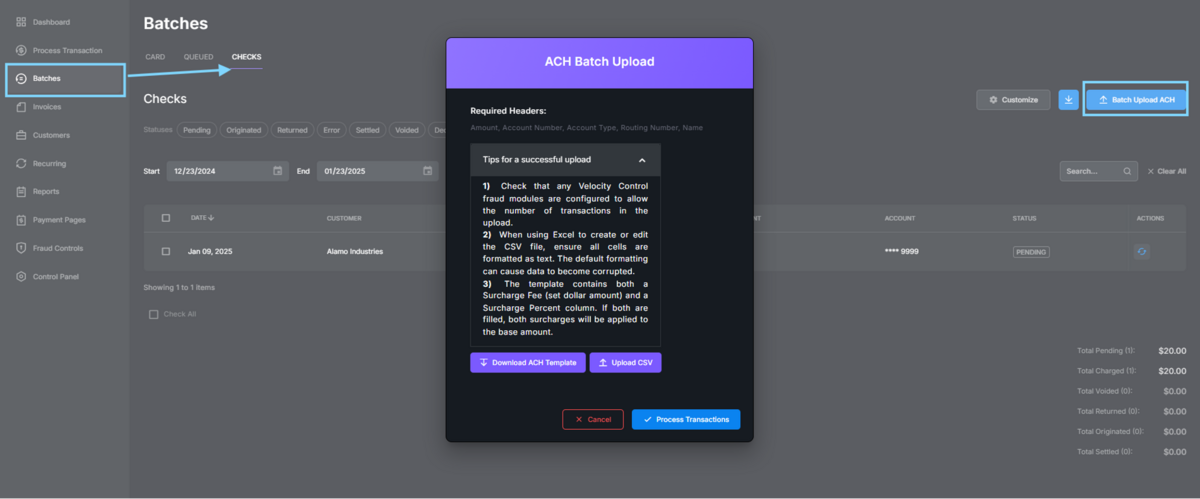
To upload a batch of ACH/Check transactions, navigate to the Batches tab on the left panel, click on the Checks
tab at the top of the page, and then select Batch Upload ACH.
Follow the instructions as detailed for a card batch upload.
The required headers for a check upload are: Amount, Account Number, Account Type, Routing Number, SEC Code, and Name.
TIP! Please check the Velocity Control settings, located in the Fraud Modules, to ensure the settings allow for batch uploads.
If there are too many transactions, the gateway may block them, assuming card testing is taking place. Make sure the parameters set are higher than the number of transactions being processed.